
API Authentication
To get started with Salesforce in Mongoose, there are a couple of simple (but critical) things that will need to be setup in your Salesforce instance. In general, the following pieces of information are needed:
- Your instance URL (for example: https://mongooseu.my.salesforce.com)
- The Client ID and Client Secret of an External App (Recommended) or a Connected App (Legacy) you have created in Salesforce
- The Username and Password with Security Token of an API user you have created in Salesforce
Creating an External App (Recommended)
The Salesforce documentation for creating a connected app can be found here. If this guide is not sufficient or if you need additional information, please see that guide for additional help.
- Use the search bar on the lefthand side to search External Client App Manager and click on that (Apps > External Client Apps > External Client App Manager).
-
Click [ New External Client App ]
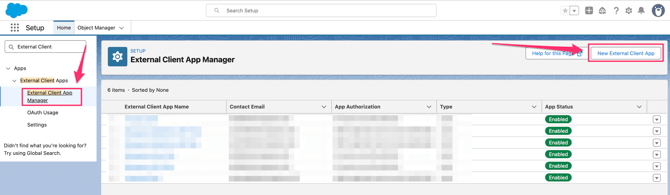
-
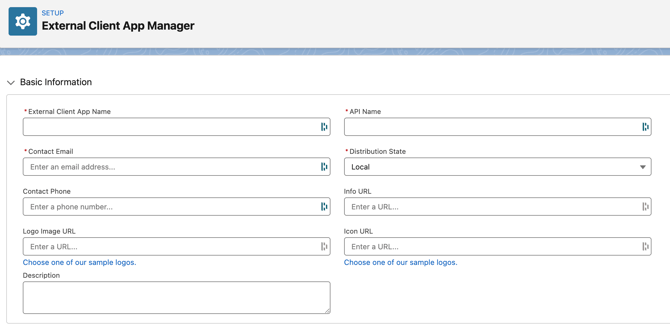
Start by filling out the required basic information. You can make these specific to your organization or use the information below:
-
External Client App Name: Mongoose API
-
API Name: Mongoose_API (this will populate automatically)
-
Contact Email: (use an internal email)
-
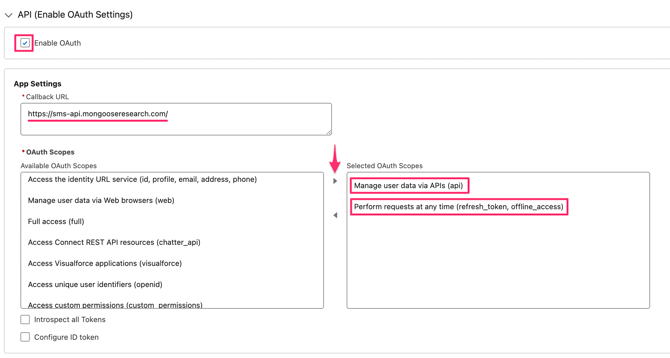
- Click the dropdown arrow for API, and click on [ Enable OAuth Settings ]
- Under App Settings:
- Copy and paste this callback URL: https://sms-api.mongooseresearch.com/
- For OAuth Scopes, find and add these two for "Selected OAuth Scopes":
- Manage user data via APIs (api)
- Perform requests at any time (refresh_token, offline_access)
-
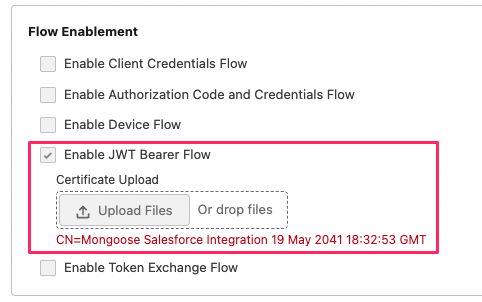
Under Flow Enablement, complete the following steps:
- Click [ Enable JWT Bearer Flow ]
-
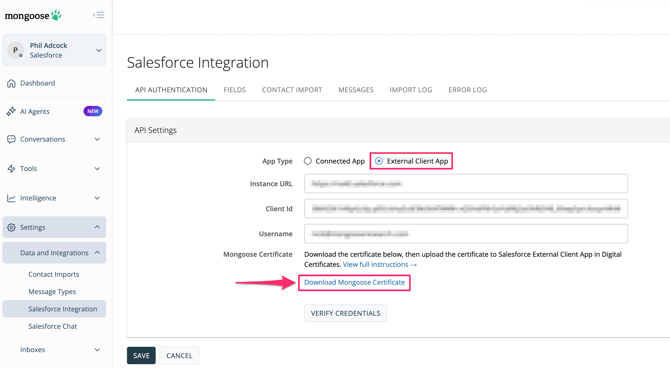
- You will need to upload a certificate. This certificate can be found in Mongoose:
- Navigate to the appropriate team
- Click Settings > Data and Integrations > Salesforce Integration > External Client App
- Please note that this page defaults to Connected App, which you will not see the link to download the certificate on this page. Click the radio button for External Client App
- Click [ Download Mongoose Certificate ]
- You will need to upload a certificate. This certificate can be found in Mongoose:
-
- With the certificate downloaded, upload it under "Enable JWT Bearer Flow"
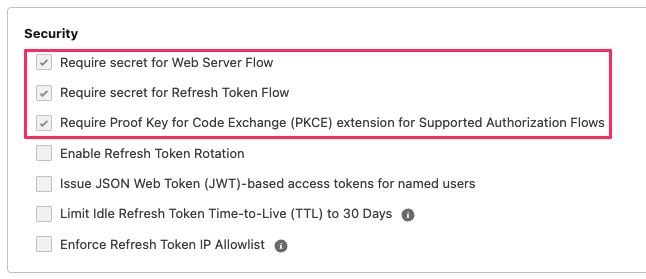
- Under Security, enable the following:
- Require secret for Web Server Flow
- Require secret for Refresh Token Flow
- Require Proof Key for Code Exchange (PKCE) extension for Supported Authorization Flows
- At the bottom of Salesforce, click the blue [ Create ] button
-
After the app is created, you will be shown a screen of information related to it. We need two pieces from this screen:
-
The Consumer Key which serves as the Client ID
-
The Consumer Secret which serves as the Client Secret
-
- On the External Client App Manager Page, click on the blue hyperlink to the Client App you just created
- On the Policies tab, click the [ Edit ] button to the right, then scroll down to OAuth Policies and click the dropdown arrow
- Under Plugin Policies > Permitted Users > select "Admin approved users are pre-authorized"
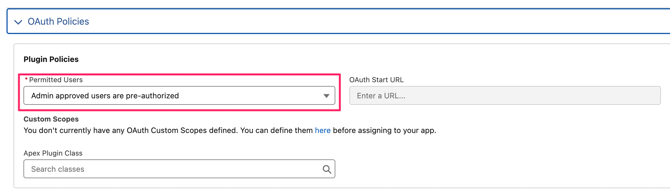
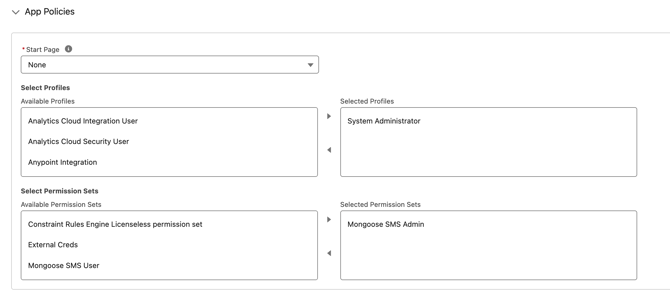
- Once selected, scroll up on this page and new drop downs will appear
- Under App Policies you will need to select a profile.
-
Click Save
- Head back to Mongoose and navigate to the appropriate team
- Add your organization's instance URL (for example: https://mongooseu.my.salesforce.com)
- Client ID (Consumer Key)
- The username (email) of the API User you created for this connection
- Once all of that information is entered, click [ VERIFY CREDENTIALS ]
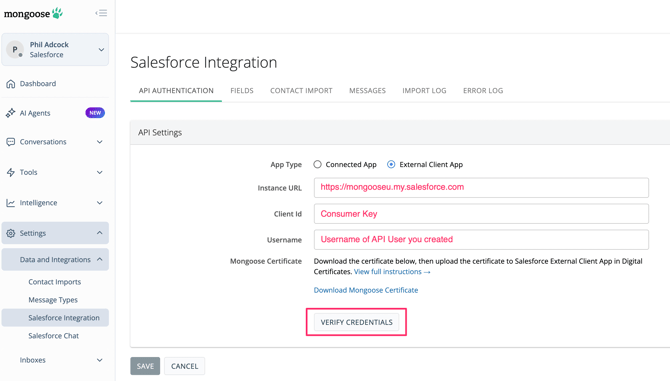
- You will get a green message in Mongoose letting you know that the credentials have been verified
- Once successfully verified, click [ SAVE ]
Creating a Connected App (Legacy)
The Salesforce documentation for creating a connected app can be found here. If this guide is not sufficient or if you need additional information, please see that guide for additional help.
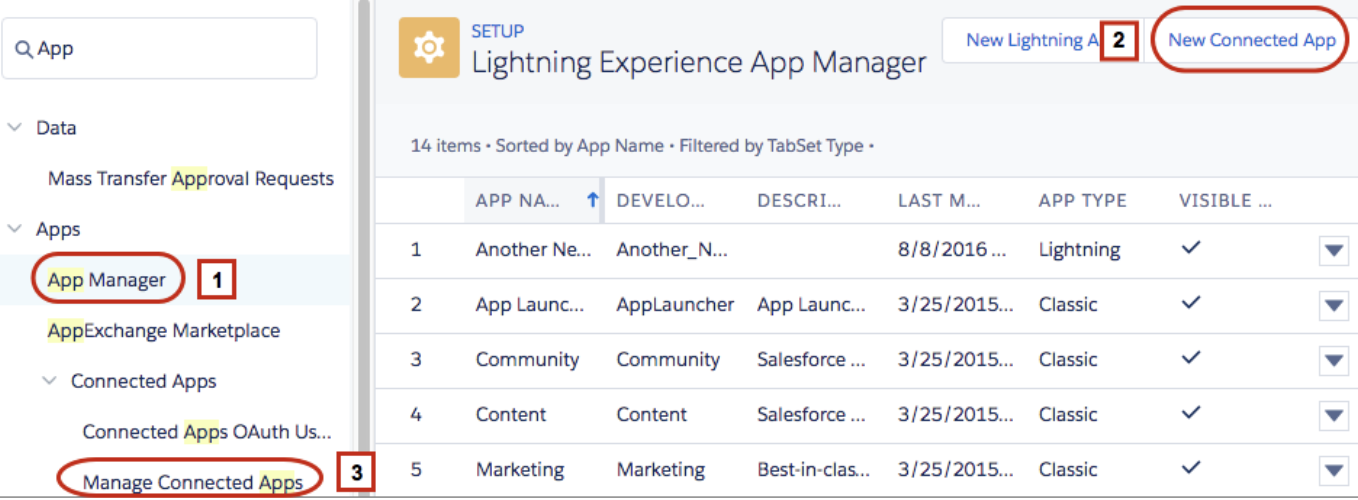
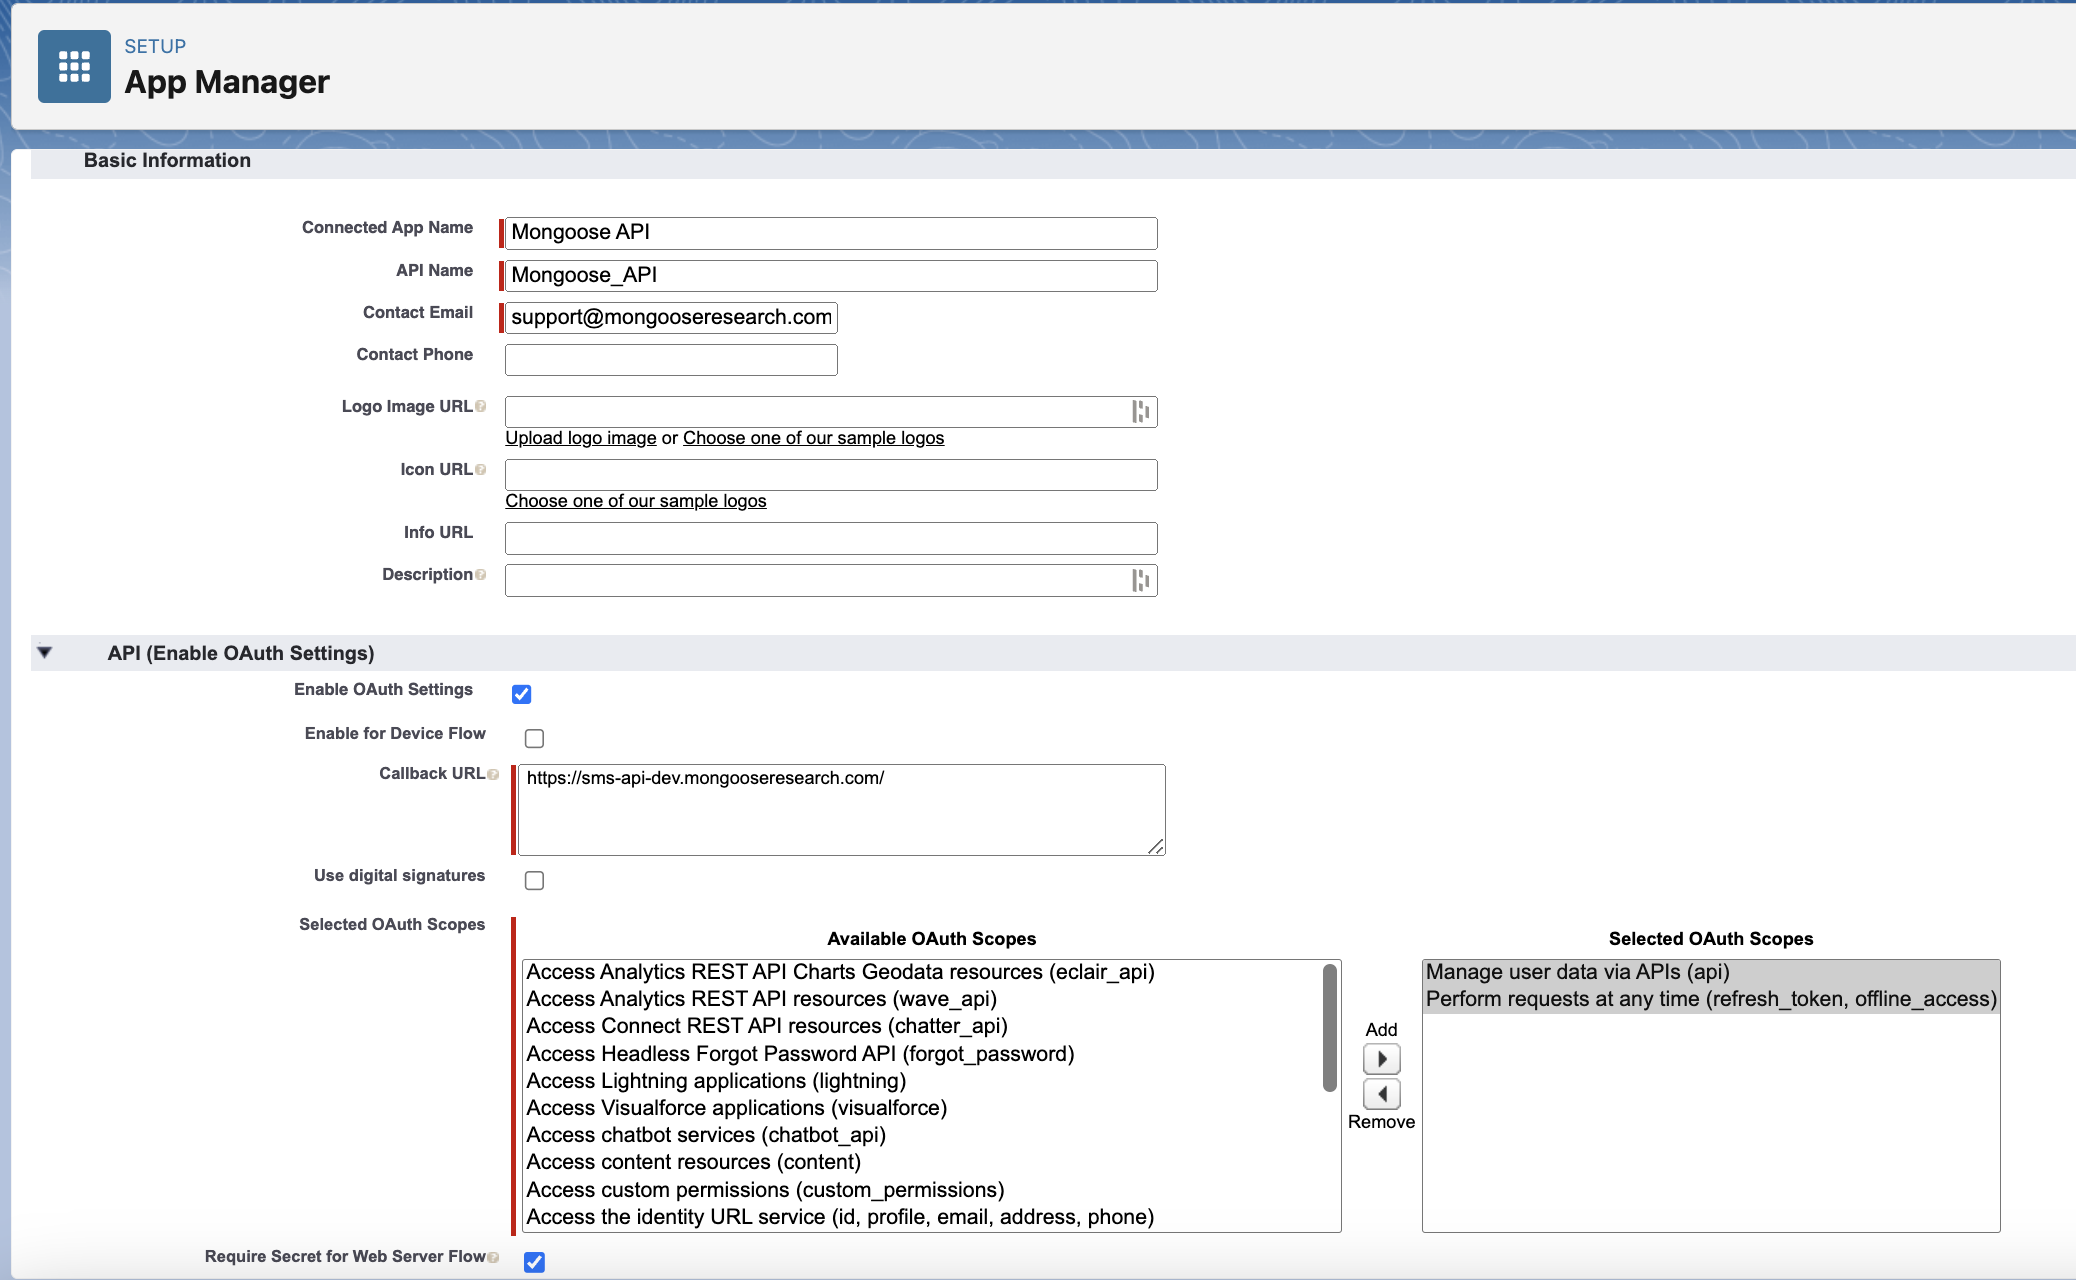
Start by searching “App” in the quick find box and selecting “App Manager”. Click “New Connected App”.
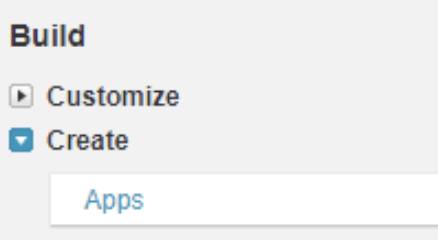
In the Classic Experience, start by searching “Apps” in the quick find box and selecting “Apps” under Build > Create. Click “New” under “Connected Apps”.

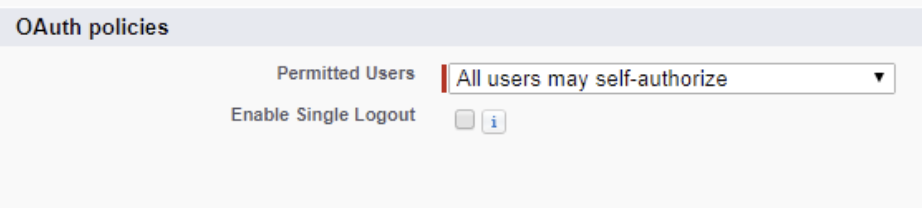
Then. fill out the form, making sure to check “Enable OAuth Settings” and add “ https://sms-api.mongooseresearch.com/” as a callback URL. Please be sure to set Permitted Users to "All users may self-authorize."
After that, we need two permissions:
- Manage user data via API's (api)
- Perform requests at any time (refresh_token, offline_access)
After the app is created, you will be shown a screen of information related to it. We need two pieces from this screen: The Consumer Key which serves as the Client ID and the Consumer Secret which serves as the Client Secret.
Troubleshooting
If you are having difficulty verifying credentials on the API Authentication page in Mongoose or not seeing any reports or list views show up, please check the following items:
- Ensure that your Instance URL is accurate. This should begin with "https".
- Ensure that your API user does not have a user profile assigned in Salesforce that does not have the required permissions set.
- Check the "Session Security Level Required at Login" setting and make sure it is blank. If there is a setting there, remove it.
